34 lines
1.6 KiB
Markdown
34 lines
1.6 KiB
Markdown
|
|
---
|
||
|
|
title: Adding Snippets to Your Sublime Text Installation
|
||
|
|
---
|
||
|
|
If you are a user of sublime text (I hope you are, it kicks ass. You can get it <a href='https://www.sublimetext.com/' target='_blank' rel='nofollow'>here</a>), then you may have already noticed some of the tab completion capabilities. For example, when you are opening an html tag such as `<p>`, it automatically closes the tag as soon as you type `/`. You can get similar functionality for pieces of code you end up re-writing over and over, and it's surprisingly easy!
|
||
|
|
|
||
|
|
Here's an example, which activates after typing `div` and then tab:
|
||
|
|
|
||
|
|
|
||
|
|
|
||
|
|
## Step 1.
|
||
|
|
|
||
|
|
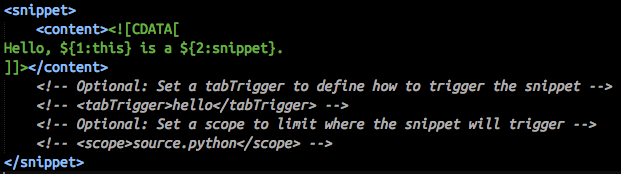
Click `Tools > New Snippet...` in the navigation bar. This will open a snippet skeletton file which will look like this:
|
||
|
|
|
||
|
|
|
||
|
|
|
||
|
|
## Step 2.
|
||
|
|
|
||
|
|
You will add the snippet by replacing the text `Hello, ${1:this} is a ${2:snippet}.`
|
||
|
|
|
||
|
|
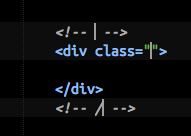
In the case of the `div` snippet, it's as simple as placing the following text in the snippet area:
|
||
|
|
|
||
|
|
<!-- $1 -->
|
||
|
|
<div class= "$1">
|
||
|
|
|
||
|
|
</div>
|
||
|
|
<!-- $1 -->
|
||
|
|
|
||
|
|
The `$` operator references the variables that will be typed in once you type `div` and then tab. In fact you can have any number of them!
|
||
|
|
|
||
|
|
## Step 3.
|
||
|
|
|
||
|
|
Save the file. You can give it any filename you want, but the extension **must** be `.sublime-snippet`. Remember, you can only have one snippet per file! I like to give them descriptive names such as `html-div.sublime-snippet`.
|
||
|
|
|
||
|
|
And there you have it! You can get as creative as you want.
|